Introduction
Hi there! My name is Nikita. At Typeable, we develop the frontend for some of our projects using the FRP approach, specifically, its Haskell implementation – reflex web-framework. The resources that offer guidelines for this framework are quite limited, so we decided to fill this gap, more or less.
In this series of posts, we will describe how a Haskell web application can be developed using reflex-platform. reflex-platform offers reflex and reflex-dom packages. The reflex package is the Haskell implementation of Functional reactive programming (FRP). The reflex-dom library contains a large number of functions, classes, and types used when dealing with DOM. The packages are separated, as it is possible to use the FRP approach for more than just web development. We will develop a Todo List application that allows carrying out various manipulations on the task list.

Understanding this series of articles requires some knowledge of Haskell, so it will be useful to get an idea of functional reactive programming first.
I won’t provide a detailed description of the FRP approach. The only things worth mentioning are the two basic polymorphic types the approach is based on:
Behavior ais a reactive time-dependent variable. It is a certain container that holds a value during its entire life cycle.Event ais an event that occurs in the system. It carries information that can only be retrieved when the event fires. Thereflexpackage also offers another new type:Dynamic ais a combination ofBehavior aandEvent a, i.e. this is a container that always holds a certain value and, similarly to an event and unlikeBehavior a, it can notify of its change.
reflex deals with the notion of a frame, i.e. a minimum time unit. A frame starts together with the occurred event, and lasts until the data processing in this event stops. An event can produce other events generated, for instance, by filtering, mapping, etc. In this case, these dependent events will also belong to the same frame.
Preparation
First of all, we will need to install nix package manager. The installation procedure is described here.
If you want to find out more about Nix and get familiar with it, check out our blog posts:
It makes sense to configure nix cash to speed up the build. If you don’t use NixOS, add the following lines to /etc/nix/nix.conf:
binary-caches = https://cache.nixos.org https://nixcache.reflex-frp.org
binary-cache-public-keys = cache.nixos.org-1:6NCHdD59X431o0gWypbMrAURkbJ16ZPMQFGspcDShjY= ryantrinkle.com-1:JJiAKaRv9mWgpVAz8dwewnZe0AzzEAzPkagE9SP5NWI=
binary-caches-parallel-connections = 40
If you use NixOS, add the following to /etc/nixos/configuration.nix:
nix.binaryCaches = [ "https://nixcache.reflex-frp.org" ];
nix.binaryCachePublicKeys = [ "ryantrinkle.com-1:JJiAKaRv9mWgpVAz8dwewnZe0AzzEAzPkagE9SP5NWI=" ];
In this tutorial, we will use the standard structure consisting of three packages:
todo-clientis the client part;todo-serveris the server part;todo-commoncontains shared modules used by the server and the client (for instance, API types).
After that, it is necessary to prepare the development environment. Follow the steps described in the documentation:
- Create the application directory:
todo-app; - Create projects
todo-common(library),todo-server(executable),todo-client(executable) intodo-app; - Configure build using
nix(filedefault.nixin directorytodo-app);- Also don’t forget to enable option
useWarp = true;;
- Also don’t forget to enable option
- Configure
cabalbuild (filescabal.projectandcabal-ghcjs.project).
At the moment of publication of this post, default.nix will look something like this:
{ reflex-platform ? ((import <nixpkgs> {}).fetchFromGitHub {
    owner = "reflex-frp";
    repo = "reflex-platform";
    rev = "efc6d923c633207d18bd4d8cae3e20110a377864";
    sha256 = "121rmnkx8nwiy96ipfyyv6vrgysv0zpr2br46y70zf4d0y1h1lz5";
    })
}:
(import reflex-platform {}).project ({ pkgs, ... }:{
  useWarp = true;

  packages = {
    todo-common = ./todo-common;
    todo-server = ./todo-server;
    todo-client = ./todo-client;
  };

  shells = {
    ghc = ["todo-common" "todo-server" "todo-client"];
    ghcjs = ["todo-common" "todo-client"];
  };
})
Note: the documentation suggests cloning the
reflex-platformrepository manually. In this example, we usednixtools to retrieve it from the repository.
During client development, it is convenient to use the ghcid tool, which automatically updates and relaunches the application after the source code changes.
To make sure that everything is working as intended, add the following code to todo-client/src/Main.hs:
{-# LANGUAGE OverloadedStrings #-}
module Main where

import Reflex.Dom

main :: IO ()
main = mainWidget $ el "h1" $ text "Hello, reflex!"
The development is carried out in nix-shell, which is why you have to open this shell at the very beginning:
$ nix-shell . -A shells.ghcTo start through ghcid, type in the following command:
$ ghcid --command 'cabal new-repl todo-client' --test 'Main.main'If everything is working, you’ll see Hello, reflex! atlocalhost:3003.
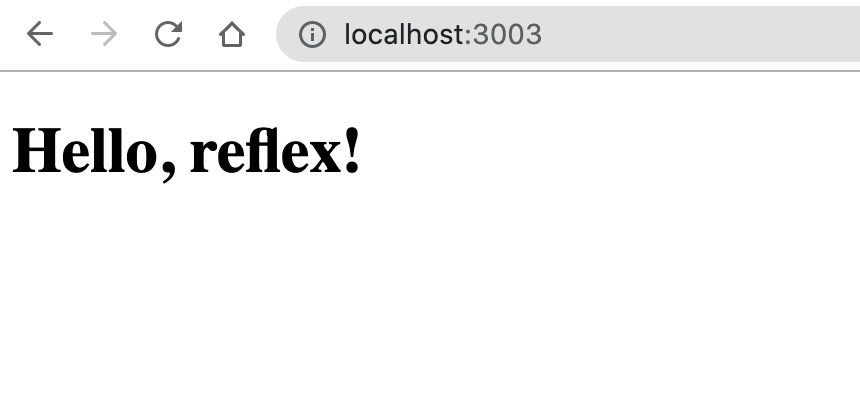
Why 3003?
The port number is searched for in the JSADDLE_WARP_PORT environment variable. If this variable is not set, the value 3003 is used by default.
How it works
You might have noticed that we used plain GHC instead of GHCJS during the build. This is possible because we use jsaddle and jsaddle-warp packages. The jsaddle package offers a JS interface for GHC and GHCJS. Using the jsaddle-warp package, we can start the server that will update DOM using web-sockets and act as a JS-engine. To this end, we set the flag useWarp = true;, otherwise, the jsaddle-webkit2gtk package would have been used by default and we would see the desktop application when we start the application. It’s worth mentioning that there are also such interfaces as jsaddle-wkwebview (for iOS applications) and jsaddle-clib (for Android applications).
The simplest TODO application
Let’s get down to development!
Add the following code to todo-client/src/Main.hs.
{-# LANGUAGE MonoLocalBinds #-}
{-# LANGUAGE OverloadedStrings #-}
module Main where

import Reflex.Dom

main :: IO ()
main = mainWidgetWithHead headWidget rootWidget

headWidget :: MonadWidget t m => m ()
headWidget = blank

rootWidget :: MonadWidget t m => m ()
rootWidget = blank
We can say that the function mainWidgetWithHead is the <html> element of the page. It accepts two parameters: head and body. There are also the functions mainWidget and mainWidgetWithCss. The first function accepts only a widget with a body element. The second one accepts styles, that are added to the style element as the first argument, and the body element as the second argument.
Any HTML element or element group will be designated as a widget. A widget can have its event network and produce some HTML code. As a matter of fact, any function generating a result of the type belonging to type classes responsible for
DOMbuilding can be called a widget.
Function blank is equal to pure (), it performs nothing, doesn’t change the DOM in any way, and does not influence the event network.
Now let’s describe the <head> element of our page.
headWidget :: MonadWidget t m => m ()
headWidget = do
  elAttr "meta" ("charset" =: "utf-8") blank
  elAttr "meta"
    (  "name" =: "viewport"
    <> "content" =: "width=device-width, initial-scale=1, shrink-to-fit=no" )
    blank
  elAttr "link"
    (  "rel" =: "stylesheet"
    <> "href" =: "https://stackpath.bootstrapcdn.com/bootstrap/4.4.1/css/bootstrap.min.css"
    <> "integrity" =: "sha384-Vkoo8x4CGsO3+Hhxv8T/Q5PaXtkKtu6ug5TOeNV6gBiFeWPGFN9MuhOf23Q9Ifjh"
    <> "crossorigin" =: "anonymous")
    blank
  el "title" $ text "TODO App"
This function generates the following content of a head element:
<meta charset="utf-8">
<meta content="width=device-width, initial-scale=1, shrink-to-fit=no" name="viewport">
<link crossorigin="anonymous" href="https://stackpath.bootstrapcdn.com/bootstrap/4.4.1/css/bootstrap.min.css"
  integrity="sha384-Vkoo8x4CGsO3+Hhxv8T/Q5PaXtkKtu6ug5TOeNV6gBiFeWPGFN9MuhOf23Q9Ifjh" rel="stylesheet">
<title>TODO App</title>
The MonadWidget class allows building or rebuilding the DOM and defining the network of events that occur on the page.
The elAttr function looks as follows:
elAttr :: forall t m a. DomBuilder t m => Text -> Map Text Text -> m a -> m aIt takes the tag name, attributes, and content of the elements. This function, as well as the whole set of DOM building functions, returns what is returned by its internal widget. In this case, our elements are empty, which is why we use blank. This is one of the most frequent uses of this function, when it is necessary to create an empty element body. The el function is used in the same way. Its input parameters include only the tag name and content. In other words, this is a simplified version of the elAttr function without attributes. Another function we use here is text. Its task is to display text on the page. This function displays all possible control characters, words, and tags, which is why the text passed to this function will be displayed exactly. The function elDynHtml is used to embed an HTML chunk.
It has to be said that, in the example above, the use of MonadWidget is redundant because this part builds an immutable DOM area. As stated before, MonadWidget allows building or rebuilding DOM, as well as defining the network of events. The functions we are using in this case require only the availability of the DomBuilder class, and here, indeed, we could write only this constraint. However, in general, there are far more constraints on the monad, that may hamper and slow down the development if we write only the classes we need at the moment. This is where we need the MonadWidget class that looks like some sort of multitool. For those who are curious, we give the list of all classes working as MonadWidget superclasses:
type MonadWidgetConstraints t m =
  ( DomBuilder t m
  , DomBuilderSpace m ~ GhcjsDomSpace
  , MonadFix m
  , MonadHold t m
  , MonadSample t (Performable m)
  , MonadReflexCreateTrigger t m
  , PostBuild t m
  , PerformEvent t m
  , MonadIO m
  , MonadIO (Performable m)
#ifndef ghcjs_HOST_OS
  , DOM.MonadJSM m
  , DOM.MonadJSM (Performable m)
#endif
  , TriggerEvent t m
  , HasJSContext m
  , HasJSContext (Performable m)
  , HasDocument m
  , MonadRef m
  , Ref m ~ Ref IO
  , MonadRef (Performable m)
  , Ref (Performable m) ~ Ref IO
  )

class MonadWidgetConstraints t m => MonadWidget t m
Now let’s move to the page element body, after defining the data type we will use for our task:
newtype Todo = Todo
  { todoText :: Text }

newTodo :: Text -> Todo
newTodo todoText = Todo {..}
The body will have the following structure:
rootWidget :: MonadWidget t m => m ()
rootWidget =
  divClass "container" $ do
    elClass "h2" "text-center mt-3" $ text "Todos"
    newTodoEv <- newTodoForm
    todosDyn <- foldDyn (:) [] newTodoEv
    delimiter
    todoListWidget todosDyn
The input of the elClass function includes the tag name, class(es) and content. divClass is the shorter version of elClass "div".
All functions mentioned are responsible for visual presentation and bear no logic, as opposed to the foldDyn function. It is defined in the reflex package and has the following signature:
foldDyn :: (Reflex t, MonadHold t m, MonadFix m) => (a -> b -> b) -> b -> Event t a -> m (Dynamic t b)It looks like foldr :: (a -> b -> b) -> b -> [a] -> b and actually plays the same role, but uses an event instead of a list. The resulting value is wrapped in the Dynamic container because it will be updated with each event. The updating procedure is set by the parameter function, with the input consisting of the value from the occurred event and the current value from Dynamic. These values are used to form a new value to be stored in Dynamic. The update will take place each time the event occurs.
In our example, foldDyn will update the dynamic task list (which is initially empty) as soon as a new task is added from the input form. New tasks will be added to the beginning of the list because we use the function (:).
The function newTodoForm builds the part of DOM containing the task description input form and returns the event that brings the new Todo. The occurrence of this event will start the task list update.
newTodoForm :: MonadWidget t m => m (Event t Todo)
newTodoForm = rowWrapper $
  el "form" $
    divClass "input-group" $ do
      iEl <- inputElement $ def
        & initialAttributes .~
          (  "type" =: "text"
          <> "class" =: "form-control"
          <> "placeholder" =: "Todo" )
      let
        newTodoDyn = newTodo <$> value iEl
        btnAttr = "class" =: "btn btn-outline-secondary"
          <> "type" =: "button"
      (btnEl, _) <- divClass "input-group-append" $
        elAttr' "button" btnAttr $ text "Add new entry"
      pure $ tagPromptlyDyn newTodoDyn $ domEvent Click btnEl
The first innovation we see here is the inputElement function. Its name speaks for itself, as it adds an input element. It takes on the InputElementConfig type as a parameter. It has a lot of fields and inherits several different classes, but the most interesting thing in this case is that it adds the required attributes to this tag. This can be done using the initialAttributes lens. The function value is a method of the HasValue class, and it returns the current value of the input. For the InputElement type, it has a type of Dynamic t Text. This value will be updated after each change in the input field.
The next change we can notice here is the use of the elAttr' function. The difference between the functions with a stroke and the functions without one for DOM building is that these functions additionally return the very page element we can manipulate. In our case, we need it to obtain the event of clicking on this element. The domEvent function serves this purpose. This function assumes the name of the event – in our case, Click – and the element the event is related to. The function has the following signature:
domEvent :: EventName eventName -> target -> Event t (DomEventType target eventName)Its return type depends on the event type and the element type. In our case, this is ().
The next function we see is tagPromptlyDyn. Its type is as follows:
tagPromptlyDyn :: Reflex t => Dynamic t a -> Event t b -> Event t aIf the event is triggered, the task of this function will be to place the value presently existing inside Dynamic into the event. That is, the event resulting from the function tagPromptlyDyn valDyn btnEv occurs simultaneously with btnEv but carries the value held by valDyn. In our example, this event will occur after a button click, and will carry the value from the text field.
Now it has to be mentioned that functions containing the word promptly in their name are potentially dangerous as they can call cycles in the event networks. On the surface, this will look as if the application got hung up. Where possible, tagPromplyDyn valDyn btnEv call should be replaced with tag (current valDyn) btnEv. The function current receives Behavior from Dynamic. These calls are not always interchangeable. If a Dynamic update and an Event event in tagPromplyDyn occur at the same moment, i.e. in one frame, the output event will contain the data the Dynamic has obtained in this frame. If we use tag (current valDyn) btnEv, the output event will contain the data that the initial current valDyn, i.e. Behavior, had in the previous frame.
Now, we’ve come to another difference between Behavior and Dynamic: if Behavior and Dynamic are updated within one frame, Dynamic will be updated in this frame, while Behavior will have a new value in the next one. In other words, if the event took place at some point in time t1 and some point in time t2, Dynamic will have the value brought by event t1 within time period [t1, t2), and Behavior will have the value brought during (t1, t2].
The function todoListWidget displays the entire Todo list.
todoListWidget :: MonadWidget t m => Dynamic t [Todo] -> m ()
todoListWidget todosDyn = rowWrapper $
  void $ simpleList todosDyn todoWidget
Here we meet the function simpleList. It has the following signature:
simpleList
  :: (Adjustable t m, MonadHold t m, PostBuild t m, MonadFix m)
  => Dynamic t [v]
  -> (Dynamic t v -> m a)
  -> m (Dynamic t [a])
This function is a part of the reflex package. In our case, it is used to arrange duplicate elements in DOM, where div elements will be listed one after the other. Its parameter is a list wrapped in Dynamic that can change over time and the function used to process each element separately. Here this is just a widget used to display each element of the list:
todoWidget :: MonadWidget t m => Dynamic t Todo -> m ()
todoWidget todoDyn =
  divClass "d-flex border-bottom" $
    divClass "p-2 flex-grow-1 my-auto" $
      dynText $ todoText <$> todoDyn
The function dynText differs from the function text in that its input contains the text wrapped in Dynamic. If a list element is changed, this value will also be updated in DOM.
We also used two more functions not mentioned before – rowWrapper and delimiter. The first function is the widget wrapping. It has nothing new and looks as follows:
rowWrapper :: MonadWidget t m => m a -> m a
rowWrapper ma =
  divClass "row justify-content-md-center" $
    divClass "col-6" ma
The function delimiter just adds a delimiting element.
delimiter :: MonadWidget t m => m ()
delimiter = rowWrapper $
  divClass "border-top mt-3" blank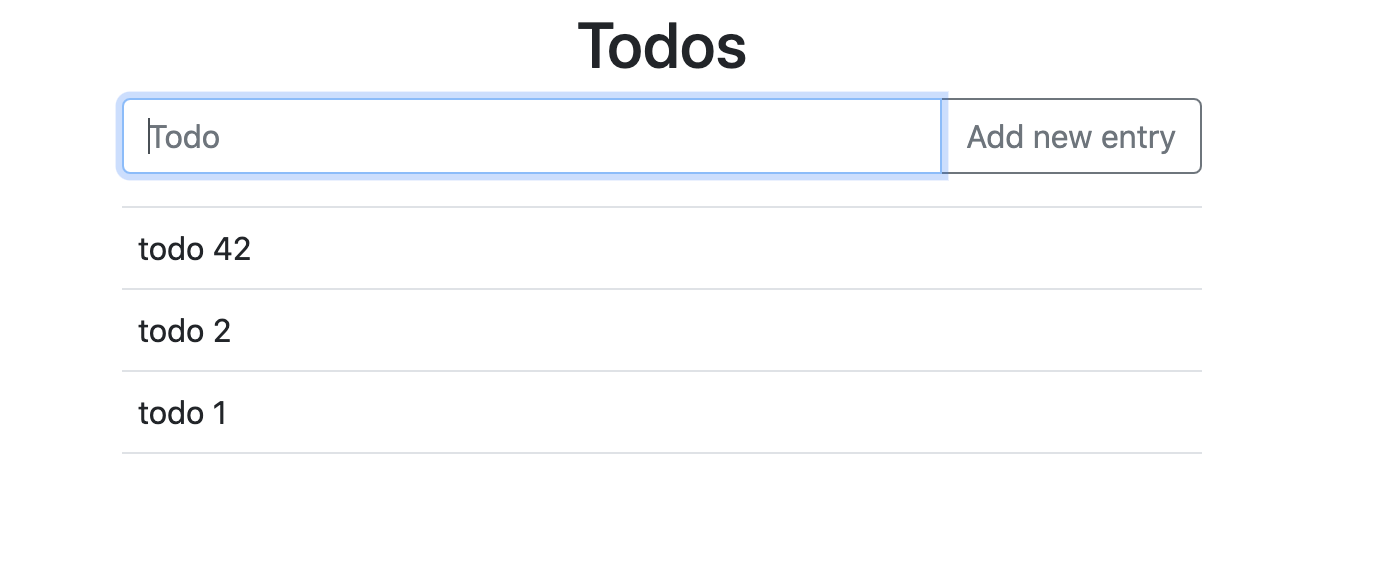
The result we obtained can be viewed in in our repository.
This is all you need to build a simple incomplete Todo application. In this part, we described the environment configuration and began developing the application. In the next part, we’ll add operations to the list elements.